When I was a freshman in high school I had a hamster. It was a bittersweet experience as my hamster lived only a few months and when I found his cold, hard body one morning it took weeks for me to get over his death. To make matter worse, no one at school understood why I was so upset about a hamster. I got looks of pity when my eyes welled up, but not of the sympathetic kind.
During my little hammie’s short life, he lived a simple one in a large bi-level metal cage. There was nothing warm or comforting about the place. It was more like a prison than a home. I regret not giving him a proper pad to roam in, but back then choices were limited. Yes he had a running wheel and tons of bedding to burrow under, but other than that life chez Zjawinski was a total bore. The idea of building a unique and custom made hamster habitat hadn’t even crossed my mind, but thanks to Flickr many hamster owners have been able to share and inspire each other with photos of their DIY palaces.
One of our most popular Pet Projects on Pawesome has been Tina‘s amazing Ikea hacked home for her dwarf hamsters. It’s since inspired many other hamster owners to hack Ikea’s Expedit bookcase into a hamster paradise. One example is Katja, who turned one Expedit into a three-story mansion for her little man Fred. Details on the remodel after the jump.
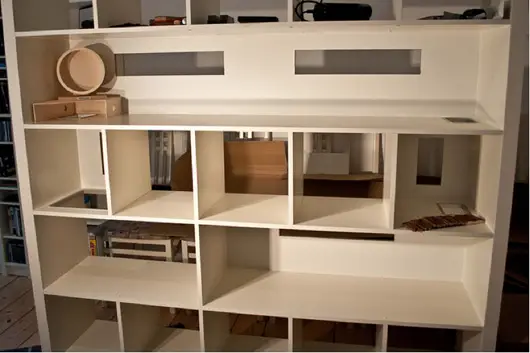
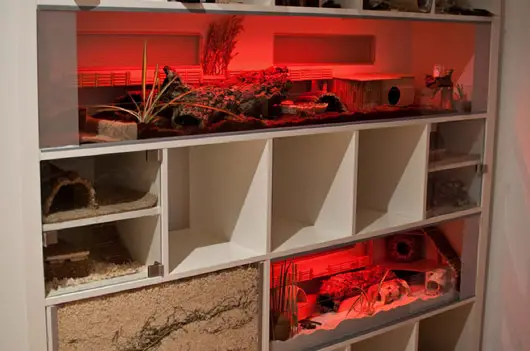
The framework of Fred’s house is based on an Ikea Expedit 5-by-5 bookshelf. Katja removed the dividers on two of the floors in order to create large spaces for Fred to run around in. The sections of the bookcase that are intended for Fred are reinforced by backs that feature cutouts for vents to allow for proper ventilation. Top to botton glass doors are installed on the fronts of all of Fred’s cubes, which keeps Fred safely inside, but allows Katja easy access for cleaning.
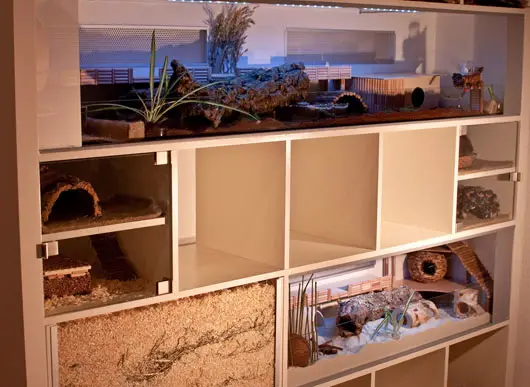
The top floor spans the entire width of the case and features plantation soil, made from coconut shells. “I wanted the whole area to be darker as a contrast to the sand area down below,” she writes on her Flickr page. She placed hemp mats around the stair openings in order to catch loose soil so as not to contaminate the floors below. The two outer boxes on the second floor act as gateways to the bottom, which features a box filled with wood shavings and hay for Fred to burrow in, along with a sandy beach to groom himself in.
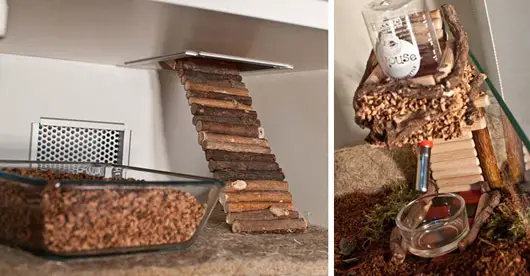
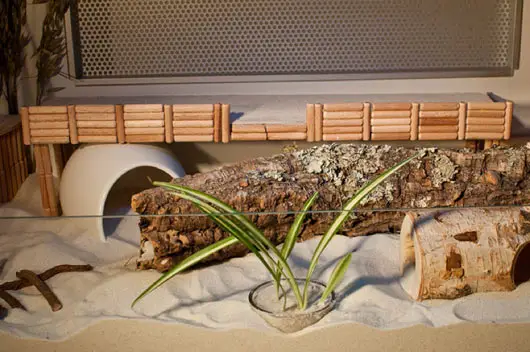
The ladders that connect floors are made using pieces of natural wood, while sections of hemp cover the floors. Katja used a simple glass cooking dish to fill with cork for Fred to play in. She also built a natural water bottle holder with dowels, cork, roots of dandelions, and willow branches. A small dish below the bottle catches any drops that miss Fred’s mouth.
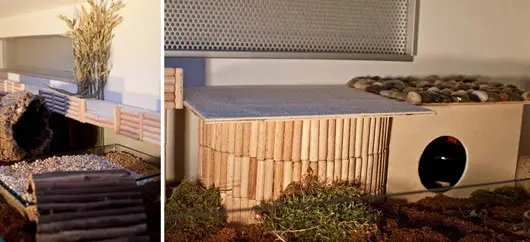
A dish on the top floor is filled with maize cob granulate in which Fred can dig for food. A willow bridge directs Fred from plantation soil to the dish. A small house on the top floor includes a small litter box filled with sand for when Fred needs to tuck away for private moments. Katja installed four-inch tall glass panels within the top section to keep soil from getting stuck in the E-profiles of the front glass doors.
The lower level includes a sand floor filled with chinchilla sand, which Fred uses for grooming. A 6-inch glass panel at the front keeps sand in place. Katja repurposed an Ikea Asker kitchen container into a small cave for Fred to hang out in. Lastly, Katja installed diode-lights to the upper level and the sand area. She can switch between between white, red and blue light. Hamsters are red blind, which allows Katja to spy on Fred without disturbing him, while blue light imitates moonlight.
It’s projects like these that make me want to try hamster life again. Thanks so much for sharing Katja!
Images: Katja